Table of Contents
Hard disk encryption
General
Please note the difference between password, PIN and extended PIN.
- Password: Passwords are used to refer to authentication of the user to the system without using TPM.
- PIN/Extended PIN: The term PIN is used when the user is authenticated to the system with the use of TPM.
- PIN: Numbers from 0-9
- Extended PIN: Various characters (upper and lower case letters, symbols, characters, spaces)
At Jade University, BitLocker is offered for systems without a connection to the Active Directory - i.e. primarily for mobile devices.
Preparations
- Back up your personal data or the system!
- Is the computer used by one or more persons?
- Recommendation for single use: Unlock the drive with a password (see below).
- Recommendation for use by several people: Unlock the drive with a USB memory stick (see below).
- Assign password for local Windows account, if not already done
- Update the operating system to the latest version (Windows update)
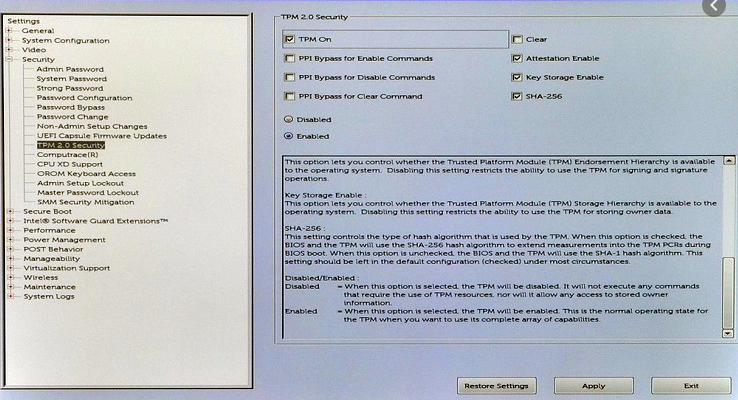
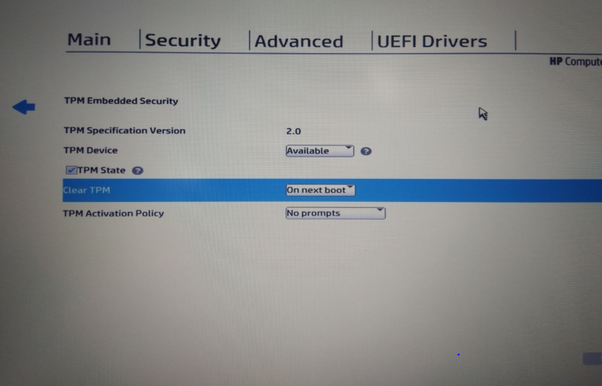
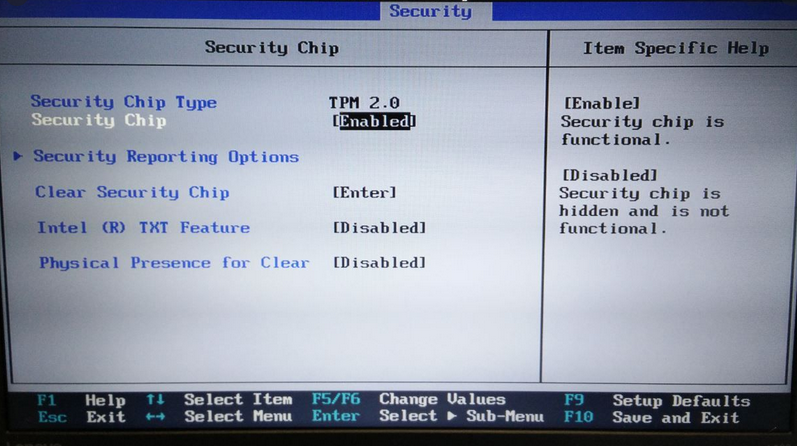
- Check the TPM status in BIOS/UEFI - Please activate! Depending on the model, the display in the BIOS/UEFI may differ.
- Call up BIOS/UEFI on Dell: F2
- Call up BIOS/UEFI on HP: F10
- Call up BIOS/UEFI on Lenovo: F1, F2 or ESC (depending on model)
- Adjust local group policies for BitLocker (see below)
- Create a password/PIN for BitLocker
- Have USB stick ready for the decryption key (only very small storage capacity required)
- For authentication via USB stick another USB stick is required


Setup
Adjustment of local group policies
Procedure:
1. open the local group policies by entering gpedit.msc in the Windows search mask. Then expand to the folder Computerkonfiguration (ENG: “Computer Configuration”) → Administrative Vorlagen (ENG: “Administrative Templates”) → Windows-Komponenten (ENG: “Windows Components”) → BitLocker Drive Encryption (ENG: “BitLocker Laufwerksverschlüsselung”). Next, click on Betriebssystemlaufwerke (ENG: “Operating System Drives”).
2. under Operating System Drives, double-click to open „Zusätzliche Authentifizierung beim Start anfordern“ (ENG: “Request additional authentication at startup”).

3. activate the option and make sure that „BitLocker ohne kompatibles TPM zulassen (…)“ (ENG: “Allow BitLocker without compatible TPM (…)”) no check mark is set. Now accept the selection and confirm with “OK”.

Encryption
Open the BitLocker administration by entering „BitLocker verwalten“ (ENG: “Manage BitLocker”) in the Windows search mask. Activate BitLocker for the desired drive by clicking on „BitLocker aktivieren“ (ENG: “Enable BitLocker”).

Note: Please note that if the system hard disk is encrypted, a previously set password will be requested during the computer startup process. If a hard disk or partition is encrypted that only functions as data storage, no password is requested here.
Specify how the drive is to be unlocked at startup.
Select here
- USB-Speicherstick anschließen - bei Nutzung mit mehreren Personen (ENG: “Connect USB memory stick - for use with several people”)
- Pin eingeben - bei Einzelnutzung (ENG: “Enter PIN - for single use”)
Create a PIN to unlock the drive.
Due to the version of Windows 10, different options may be offered to unlock the drive. The University Computing Center only offers the use of a PIN or a stick.
How should the recovery key be saved.
- Option 1: Auf USB-Speicherstick speichern (ENG: “Save to USB memory stick”).
- However, use this only to back up the recovery key, not for other tasks.
- Option 2: In Datei speichern (ENG: “Save to file”) (HRZ recommendation).
- Save the recovery file in a location outside your PC (e.g. Laufwerk Z:\ (ENG:“drive Z:\”)).
- Option 3: Print recovery key
- Print on paper
The recovery key must never be on the encrypted device. Depending on the version and release status of Windows 10, it may be offered to save the recovery key on a Microsoft account - which we do not recommend this. It is generally advisable to save the key on a medium that is not accessible at all times.
Select how much disk space of the drive should be encrypted.
Select the option „Gesamtes Laufwerk verschlüsseln“ (ENG: “Encrypt entire drive”) here.

„Neuer Verschlüsselungsmodus“ (ENG: “Select encryption mode to use”).
Select the option „Neuer Verschlüsselungsmodus“ (ENG: “New encryption mode”) here.

Do you want to encrypt the drive now?
Activate the option „BitLocker-Systemüberprüfung ausführen“ (ENG: “Run BitLocker system check”) and follow the instructions. The computer must then be restarted for BitLocker drive encryption.
Options
Encryption of external data carriers
- Enable Bitlocker on the corresponding drive

2. enter the password and click on “weiter” (ENG: “continue”)
3. print the recovery key and save it on an external data storage device. This data storage should only be used for keeping the recovery key. Please also note the possibility of our custody function under drive “x” (See section: “How should the recovery key be stored”)

4. please select „gesamtes Laufwerk verschlüsseln“ (ENG: “encrypt entire drive”).

5. please select the “kompatiblen Modus” (ENG: “compatible mode”).

6. confirm the process. Finally, your external data carrier is encrypted
Decryption of drives
To decrypt the drive you have to click on more options and then select „Wiederherstellungsschlüssel eingeben“ (ENG: “Enter recovery key”).
Info: If you have already entered the password to unlock the drive before or if the drive is unlocked automatically, entering the recovery key is not necessary or possible during a subsequent decryption*.
BitLocker can accordingly be completely deactivated by entering the password without the need for additional identification. In this case, deactivation is the same as decryption.
*refers to a user with administrator rights. The deactivation of BitLocker can be prevented by restricting the rights of a standard user.
Unlocking drives
- You can activate or deactivate the automatic unlocking of a drive. To do this, right-click on the drive and select „BitLocker verwalten“ (ENG: “Manage BitLocker”)
- Unlock by double-clicking on the drive and entering the password (if it is not a system partition)
- Automatic unlocking of the drive on certain computers. To do this, check the box „Auf diesem PC automatisch entsperren“ (ENG: “Unlock automatically on this PC”) and confirm by entering the password

Save system startup key on multiple USB memory sticks
Right-click on a BitLocker-protected drive to open the „BitLocker verwalten“ (ENG: “Manage BitLocker”) menu. Here the system startup key can be duplicated. Alternatively, the file can also be copied. However, this is marked as a system file by default and is therefore hidden.